Building a Secure Remote Connection on ParrotOS
Setting Up SSH Access Into Proxmox VMs Using WSL
In this project, I set out to configure secure SSH access into my Linux virtual machines hosted on Proxmox, using the Windows Subsystem for Linux (WSL).
Instead of relying on third-party SSH clients, I wanted a lightweight, built-in solution that allowed me to connect directly to my VMs from my Windows environment and eventually use certificate-based authentication for seamless logins.
Why WSL for SSH?
While tools like PuTTY and MobaXterm are popular for managing SSH connections on Windows, WSL offers a more native Linux experience. It allows me to:
Use the built-in Linux ssh client directly from my Windows machine
Manage SSH keys and certificates without installing extra tools
Practice using Linux commands in a real shell environment
Avoid juggling multiple third-party apps
If you’re working on cybersecurity, networking, or Linux administration, WSL is an excellent way to keep your workflow clean and efficient.
Step 1 — Setting Up WSL
I started by installing Windows Subsystem for Linux (WSL) using Microsoft’s official guide:
🔗 How to Install WSL
After the installation:
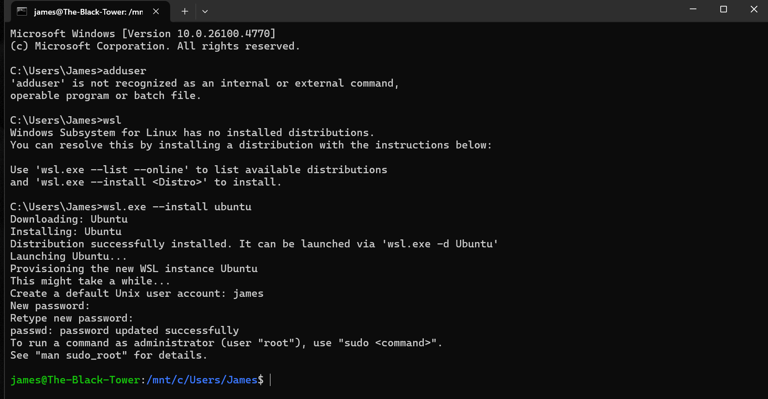
WSL automatically prompted me to set up a username and password for my Linux environment.
Once configured, I had a functional Linux shell ready to go from my Windows terminal.
To launch WSL, I simply run:
wsl
(Insert Screenshot #1 here — showing WSL installation or shell setup.)
Step 2 — Attempting SSH Into the Proxmox VM
Next, I wanted to SSH into one of my Proxmox-hosted Fedora VMs from my WSL terminal.
I checked the VM’s IP address by running inside the Fedora VM:
ip a
The result showed:
192.168.50.196
So, I tried a basic SSH connection from WSL:
ssh username@192.168.50.196
(Insert Screenshot #2 here — showing the failed SSH attempt.)
But the connection failed. That meant I needed to troubleshoot.
Step 3 — Troubleshooting SSH Connectivity
When SSH fails, there are three main areas to check:
1. Is the VM’s IP Address Correct?
Make sure the IP you’re using belongs to the VM itself, not the Proxmox host.
Check from Proxmox Web UI → VM → Summary → Network
Confirm the VM has a valid IP in your LAN subnet.
2. Is the VM Reachable Over the Network?
From WSL, try pinging the VM:
ping 192.168.50.196
If the ping works → The VM is reachable.
If it fails → There’s a networking issue. Check:
Proxmox VM network adapter is set to Bridged mode (vmbr0).
The VM has a valid gateway and DNS configuration.
Your firewall isn’t blocking ICMP.
3. Is SSH Running and Listening on the VM?
Inside the Fedora VM, confirm the SSH daemon is active:
sudo systemctl status sshd
If it’s inactive:
sudo systemctl enable sshd sudo systemctl start sshd
Also, confirm SSH is listening on port 22:
ss -tulpn | grep ssh
If port 22 is closed, open it:
sudo firewall-cmd --permanent --add-service=ssh sudo firewall-cmd --reload
Step 4 — Next Steps:
Setting Up Certificate-Based SSH Authentication
Once I have basic SSH connectivity working, the goal is to move away from password authentication and enable certificate-based SSH login for better security.
High-level steps:
Generate an SSH keypair inside WSL:
ssh-keygen -t rsa -b 4096
Copy the public key to the VM:
ssh-copy-id username@192.168.50.196
Test login without a password:
ssh username@192.168.50.196
(Optional) Configure ~/.ssh/config in WSL for quick access.
I’ll cover the full certificate setup in a future blog post.
Wrap-Up
At this stage of the project, I’ve:
Installed and configured WSL on Windows
Set up a Linux terminal environment for SSH access
Begun troubleshooting SSH connectivity to my Proxmox-hosted Fedora VM
Planned to move toward passwordless SSH using certificates
Once SSH is working reliably, this will streamline remote access to all my Proxmox VMs and provide a secure, native workflow for managing multiple Linux environments.